How to Install HYDRO-BLOK Shower Bench
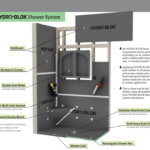
Before Installing your HYDRO-BLOK Shower System
Perform a final floor and wall measurement check to ensure all walls are square and make any adjustments required BEFORE installing your HYDRO-BLOK shower system.
Installing HYDRO-BLOK Shower Benches
This installation guide can be used for both HYDRO-BLOK Suspended Benches and HYDRO-BLOK Diamond Benches. Differences in installation will be noted where required.
Each side support must to aached to the stud wall or similar support using HYDRO-BLOK screws & washers at two locations at least 8″ apart. The innermost location must be at least 3″ from the shower corner. Add additional wood support if required before installing HYDRO-BLOK wallboard.
Installation Tools and Materials Required
• #2 Robertson (square) screwdriver drill bit
• Corner Puy Knife (supplied with HYDRO-BLOK Shower Pans)
• Fine Point Marker
• Level
• Tape Measure
• 12″ to 16″ Level
• Cleaning supplies (we recommend paper towels, citrus wipes, rags, dust pan and brush)
Step 1: Positioning the Shower Bench
Decide on a suitable corner in your shower for your shower bench to be installed, ensuring it will not interfere with a proper standing position based on your shower head placement. Mark the positions of the two studs which are closest to the corner on both walls (e.g. a corner stud and another stud 16″ OC from the corner stud)

Step 2: Installing the Shower Bench

Step 3: Check the shower for proper support
Place one of the support pieces below the line from step 2 and mark a new line underneath the support from the edge to the corner. Repeat for the other wall.

Step 4: Place one of the support pieces
Place one of the support pieces below the line from step 2 and mark a new line underneath the support from the edge to the corner. Repeat for the other wall.

Step 5: Place the support in position
Place the support in position, aligning the top edge of the support piece with the lower of the two marked lines.

Step 6: Screw at each stud location
Attach the support to the wall using a HYDRO-BLOK washer and included 3 ½” screw at each stud location. Repeat steps 4 to 6 for the other side support, applying additional joint sealant to the face where the supports will meet in the corner.

Step 7: Smooth out any excess joint
Smooth out any excess joint sealant on the underside of the supports with a corner putty knife. Dry-fit the bench in position to ensure it sits evenly and level on the supports.

Step 8 : Install HYDRO-BLOK Suspended Bench and Diamond Bench
HYDRO-BLOK Suspended Bench (shown)
Apply a continuous ½” bead of joint sealant to the top and front faces of both bench supports in an “S” pattern. Also apply a ½” continuous bead of joint sealant in an “S” pattern on the foam faces of the bench that will contact the wallboard.
HYDRO-BLOK Diamond Bench
Apply a continuous ½” bead of joint sealant to the top and front faces of both bench supports. Also apply a ½” continuous bead of joint sealant in an “S” pattern covering the faces of the bench that will contact the wallboard.

Step 9 : Position the bench and firmly press
HYDRO-BLOK Suspended Bench
Position the bench and firmly press it into place on the two supports and against the wallboard. Smooth out any excess joint sealant with a corner putty knife.
HYDRO-BLOK Diamond Bench
Slide the bench evenly into place on the supports, ensuring it is positioned firmly in the corner so that both inner faces are in contact with the wallboard.

Step 10 : Ensure joint sealant
Apply a final ½” continuous bead of joint sealant along all joints and smooth out with the corner putty knife. Ensure there is at least 1″ of joint sealant on either side of all seams.

Step 11 : Give time for set
After approximately one hour (at room temperature of at least 18° C or 65° F) the HYDRO-BLOK joint sealant will skin over and thinset can safely be applied.

Share This Article
Choose Your Platform: