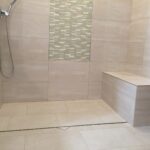
A shower pan liner is a waterproof barrier installed beneath a shower floor to prevent water from leaking into the subfloor and surrounding areas. It serves as a crucial component in shower construction by ensuring that water stays contained and does not cause damage or mold growth.
Many liners are made from durable, flexible materials like PVC, which makes them easy to cut and fit to different shower shapes. Because water leaks can cause serious problems, using a quality shower pan liner is key for long-lasting, reliable waterproofing in tile and other types of showers.

What Is a Shower Pan Liner?
A shower pan liner is a thin, waterproof layer that sits beneath the shower floor. It stops water from leaking into the walls and floor below. This part is hidden but vital for keeping the bathroom dry and preventing damage.
Purpose of a Shower Pan Liner
The main purpose of a shower pan liner is to prevent water from leaking outside the shower base. It creates a barrier that protects the subfloor and walls from moisture. Without it, water can seep in, causing mold, rot, or structural damage.
It also helps extend the shower’s life by protecting materials underneath the tiles. The liner guards against leaks at joints and corners, which are common places for water to escape.
Materials Used for Shower Pan Liners
Shower pan liners are usually made from PVC (Polyvinyl Chloride) or CPE (Chlorinated Polyethylene). These materials are flexible, waterproof, and durable.
They come in large sheets, often 4 to 6 feet wide, to cover the entire shower base without gaps. This makes installation easier and provides a continuous protective layer.
How a Shower Pan Liner Works
The liner sits under the shower floor, usually on top of a pre-sloped base that directs water towards the drain. When water hits the shower floor, the liner catches and channels it sideways to the drain pipe.
It seals the entire shower floor area, including corners and edges, stopping water from reaching the wood or concrete beneath. The liner must be installed carefully to maintain a leak-proof barrier.
Types of Shower Pan Liners
PVC vs. CPE Shower Pan Liners
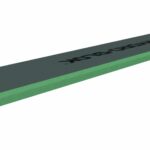
PVC (Polyvinyl Chloride) liners are the most common type used in shower pans. They are made from a flexible plastic sheet that is waterproof and resistant to mold and mildew. PVC liners typically come in thicknesses of 30 or 40 mils and work well with standard shower floors.
CPE (Chlorinated Polyethylene) liners are less common but important when certain conditions exist. They offer better heat resistance, making them ideal for floors with radiant heating systems. CPE liners can handle higher temperatures without degrading, which extends the liner’s lifespan under heated floors.
Both types are waterproof membranes installed under the shower base, but the choice between PVC and CPE should be based on the floor’s heating setup and local building codes.
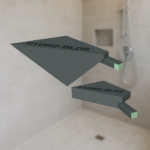
Pre-Formed Liners
Pre-formed liners are molded plastic trays designed to fit the dimensions of specific shower pans. These liners provide a solid, waterproof base that simplifies installation compared to sheet liners.
They come in various sizes and shapes, including rectangular, neo-angle, and custom sizes. Installation is faster because the liner already has the proper slope for drainage.
Pre-formed liners are less flexible than sheet liners but reduce chances of improper installation. They are typically used in smaller or standard shower designs but may be limited if a unique shape or size is required.
Custom-Fabricated Liners
Custom-fabricated liners are made by cutting and joining heavy-duty sheets to fit unusual or large shower bases. This method is used when showers have non-standard sizes or shapes, where pre-formed or standard sheets won’t work properly.
The fabricator measures the shower area and creates a liner that covers all corners and slopes correctly. This type of liner can be made from PVC or CPE sheets and often includes seams professionally sealed for waterproofing.
Custom liners offer maximum protection against water leaks but require professional installation and testing, such as flood tests to ensure no leaks before the final flooring is installed.
Processus d'installation
Site Preparation
The subfloor must be clean, level, and dry before installing the shower pan liner. Usually, the subfloor is plywood, but the process is similar for concrete.
A mortar bed is often applied to create the correct slope toward the drain. This slope is critical to avoid standing water.
Install the shower drain flange first, making sure it is secure and properly aligned with the drain pipe. The flange must be flush with the mortar bed or subfloor.
Check that the drain assembly is leak-free and tightly fastened. Preparing tools, including a utility knife, measuring tape, and sealant, is essential before starting the liner placement.
Liner Placement and Sealing
Cut the liner to fit the shower base with at least 6 inches of extra material on all sides. The liner should extend up the shower walls by 6 to 8 inches.
Place the liner smoothly over the mortar bed without wrinkles. Use a staple gun to fasten the liner to the studs above the rough opening.
Seal the liner to the drain flange by tightening the clamping ring. Ensure the liner overlaps the drain hole evenly to avoid leaks.
Corners should be sealed with corner dams or folded carefully to prevent water from pooling. Overlap seams must be watertight and free of gaps.
Trim excess liner above the clamping ring after securing the drain, but leave enough overlap for any adjustments.
Leak Testing Procedures
Before covering the liner with mortar or tiles, perform a leak test by plugging the drain and filling the pan with water.
Fill the pan to a depth of 2 to 3 inches and let it sit for at least 24 hours. Inspect the floor below for signs of water leakage or dampness.
If no leaks occur, slowly drain the water and observe the drain area for proper drainage. Any leaks must be repaired before continuing.
Use a moisture meter or visual check to confirm the liner’s integrity. Leak testing is crucial to avoid costly repairs later.
Common Issues and Troubleshooting
Detecting Leaks
Leaks often start small and can be hard to spot at first. Signs include water stains on the ceiling or floor below the shower, a musty smell, or soft spots in the bathroom floor.
Water pooling around the shower base or grout cracks can also signal liner failure. Testing involves running water in the shower and closely checking for damp areas outside the pan.
It is important to identify whether leaks come from the liner or other parts like drains or tiles. Early detection can reduce damage to subfloors and walls.
Repairing Damaged Liners
When a liner is cracked or punctured, it must be fixed quickly to avoid water damage. Small holes can sometimes be patched using a waterproof tape or liner patch kits available in stores.
For larger damage, the shower pan may require partial or full liner replacement. This usually involves removing tiles, inspecting the base, and reinstalling a new liner with proper sealing.
In every repair, the liner must be sealed tightly around the drain and against shower walls to prevent future leaks.
Prévenir la moisissure
Moisture trapped under a damaged liner encourages mold growth. Keeping the shower well-ventilated after use reduces excess moisture.
Using mold-resistant sealants and cleaning grout regularly helps stop mold buildup. Fixing leaks promptly is key to stopping mold spores from spreading under floors or walls.
Routine inspection of the liner and grout helps catch any issues that could lead to mold, preserving bathroom safety and hygiene.
Maintenance and Longevity
Routine Inspections
Regularly checking the shower pan liner is essential. Look for cracks, holes, or soft spots in the liner. These signs can allow water to escape and damage the underlying floor.
Inspect the grout and caulking around the shower as well. Damaged grout or missing caulking can let water seep behind the liner. Moisture buildup under the shower can lead to mold and rot.
It’s best to perform these inspections every few months. Small problems caught early are easier and cheaper to fix. Documenting changes can help track liner condition over time.
Extending Shower Pan Liner Life
Keeping the liner dry and clean extends its life. Regularly clean soap scum and mildew using non-abrasive cleaners designed for bathroom use.
Avoid letting water pool in the shower. Wiping down surfaces after use lowers moisture that can harm the liner. Proper ventilation reduces humidity and helps prevent mold growth.
If any damage is found, repair it immediately to prevent leaks. Routine maintenance like resealing grout and caulking also helps protect the liner and foundation.
By following these steps, shower pan liners often reach their full 10-15 year lifespan or longer.
Contact Hydroblok for Shower Pan Liner Installation
While DIY installation is possible, mistakes can lead to leaks, mold, and costly repairs. Working with experts ensures your shower pan liner is installed correctly and lasts for years. Hydroblok provides high-quality shower system products designed for durability, easy installation, and long-term waterproof protection.
If you’re planning a new shower or upgrading an old one, contacting Hydroblok is the best way to ensure your shower pan liner is fitted and sealed properly. Their team and products are built to help homeowners and contractors create bathrooms that are safe, reliable, and worry-free.


Partagez cet article
Choisissez votre plate-forme :