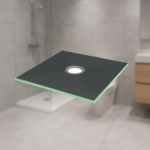
Removing a shower drain cover is a simple yet essential task, whether you’re cleaning the drain, replacing an old cover, or addressing plumbing issues. Understanding how to remove it properly will help prevent damage to the drain and ensure everything functions smoothly. In this guide, we will explain how to remove a shower drain cover, covering different types and their removal methods.

Removing a Shower Drain Cover
Removing a shower drain cover is a simple yet essential task, whether you’re cleaning the drain, replacing an old cover, or addressing plumbing issues. Understanding how to remove it properly will help prevent damage to the drain and ensure everything functions smoothly. In this guide, we’ll walk through how to remove a shower drain cover, covering different types and their removal methods.
Know Your Drain Cover Type
Before you begin, it’s helpful to understand the type of drain cover you’re dealing with. There are several types of shower drain covers, and each requires a different removal method. The most common types include screw-in, snap-in, twist-off, and push-fit covers. Identifying your cover type is the first step in choosing the right approach.
For screw-in covers, you’ll need a screwdriver to remove the screws. Snap-in and push-fit covers don’t have screws but may need a bit of prying or pulling to remove. Twist-off covers can usually be unscrewed by hand or with a tool, depending on how tightly they’re fastened.
Gather Your Tools
While the process doesn’t require many tools, having the right ones makes the job easier. For screw-in covers, you’ll need a screwdriver (flathead or Phillips). For snap-in or push-fit covers, pliers or a flathead screwdriver can help you grip and pry. A putty knife または flat pry bar may be useful for stubborn covers.
Wear rubber gloves to protect your hands and improve grip — especially if there’s grime or buildup around the drain.
Prepare the Area
Clear the shower area to make room to work. Dry up any standing water so you have a clean surface, and place a towel around the drain to catch any spills. Once the area is dry, inspect the cover to determine how it’s secured — screw-in, snap-in, or twist-off — so you can proceed with the right method.
Removing a Screw-in Drain Cover
If your shower drain cover is secured with screws, locate them around the edge or center of the cover. Use a screwdriver to turn them counterclockwise until they’re loose. Once removed, lift the cover carefully.
If the screws are rusted or stuck, apply a lubricant to loosen them. In tougher cases, use a drill with a screw-removal attachment to avoid damaging the screw heads. Wiggle the cover gently to release it from the drain.
Removing Snap-in or Push-fit Covers
Snap-in and push-fit covers don’t use screws, but they can be snug. Check for tabs or edges where you can grip with your fingers or pliers. Try to pry gently with your fingers first. If that doesn’t work, use a flathead screwdriver to lift around the edges evenly.
If the cover still won’t move, use pliers to pull carefully — but avoid applying too much force, as it could damage the cover or drain.
Removing Twist-off Covers
Twist-off drain covers have a locking mechanism that allows you to unscrew them. Grip the cover by its notches or grooves and twist counterclockwise. Use pliers if it’s too tight, but avoid over-gripping to prevent cracks.
Apply a small amount of lubricant to the threads if it’s hard to twist. Once loosened, lift the cover off completely.
Clean the Drain Area
After removing the cover, take the opportunity to clean the drain. Hair, soap scum, and debris often accumulate and cause slow drainage. Use a drain snake または tweezers to clear the buildup. Wipe the surrounding area with a damp cloth, and run hot water down the drain to flush out remaining residue.
Reinstalling the Drain Cover
Once the area is clean, reinstall the cover by reversing the removal process. For screw-in covers, align and tighten the screws gently. For snap-in or push-fit types, press the cover firmly into place. For twist-off covers, align and twist clockwise until it locks securely.
Avoid over-tightening to prevent damage.
Test the Drain
Run water through the shower to make sure it drains properly. Check for any leaks or misalignment around the cover. If the water isn’t draining well, recheck the installation and clear any leftover debris.
結論
Removing a shower drain cover is straightforward once you know what type you have. Whether it’s screw-in, snap-in, twist-off, or push-fit, the process just takes patience and the right tools. After removing it, take time to clean the drain and inspect for clogs or damage. Regular maintenance ensures your shower stays clean, drains efficiently, and avoids future plumbing headaches.


この記事を共有する
プラットフォームを選択してください: